 A VETERAN OWNED SMALL BUSINESS |
Elevating Your Outdoor Space with Custom Hardscaping
Understanding Driveway Deterioration: Why Tarmac and Asphalt Fail
A smooth, well-maintained tarmac driveway is a hallmark of a distinguished property. However, over time, even the most robust surfaces can succumb to wear and tear, developing unsightly and hazardous potholes. Understanding the root causes of these imperfections is the first step toward effective repair and prevention.
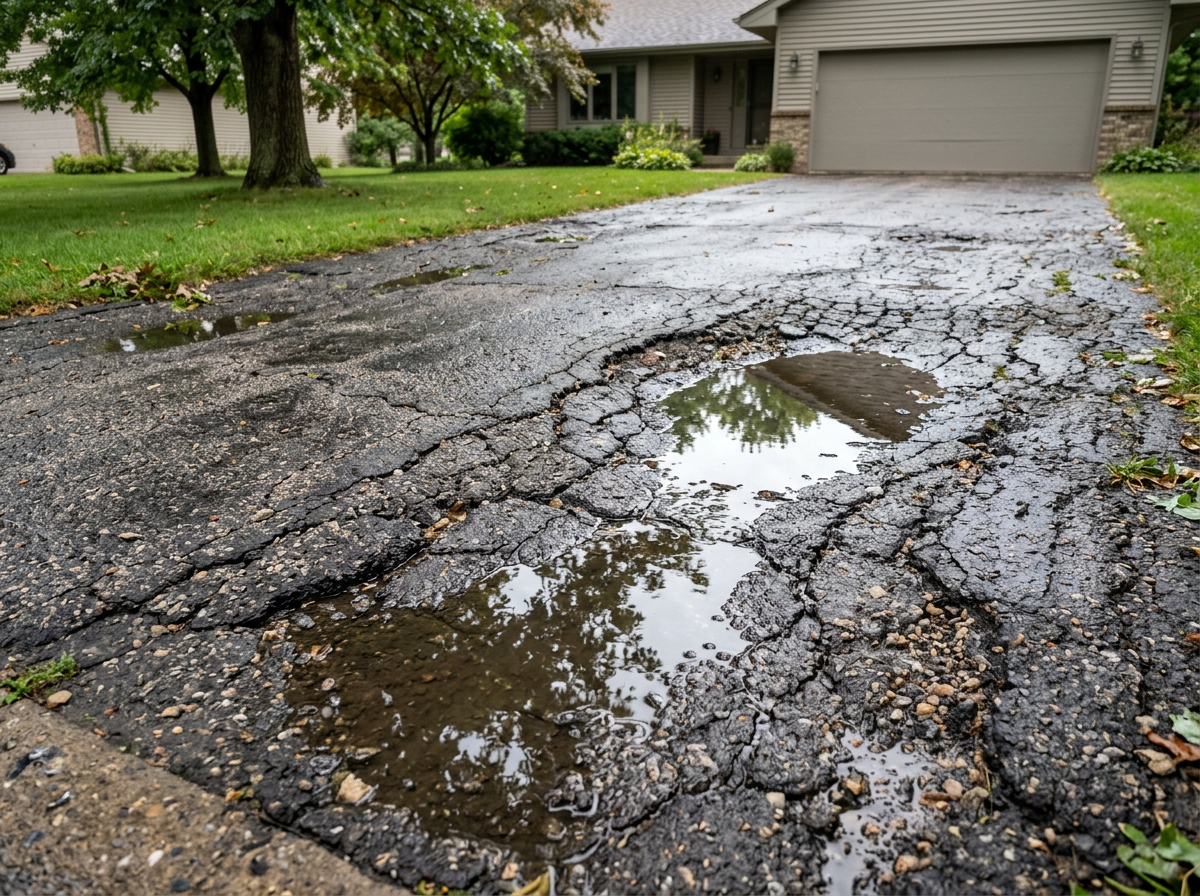
The primary culprit behind tarmac and asphalt deterioration is often water infiltration. What begins as a hairline crack, perhaps due to the natural expansion and contraction of the material from daily temperature fluctuations, becomes an entry point for moisture. This water then seeps into the sub-base, weakening the foundation beneath the surface. In colder climates, the infamous freeze-thaw cycle exacerbates this problem. As temperatures drop below freezing, the trapped water expands, pushing against the tarmac from within. When it thaws, it leaves behind a void, and the process repeats, gradually loosening aggregate and enlarging the crack. Over time, the constant pressure from vehicles passing over these weakened areas causes the surface to crumble, eventually forming a pothole.
Beyond environmental factors, chemical corrosion also plays a significant role in binder dissolution, particularly in tarmac. Tarmac, being an oil-based material, is vulnerable to substances like engine oil, petrol, diesel, and even brake fluid. A small spill can “eat” through the binder, softening the surface and allowing a screwdriver or shoe heel to sink in within days. This chemical attack weakens the structural integrity, making the area prone to further damage and pothole formation. Neglecting these early signs, such as small cracks or areas of fading discoloration (which indicates a loss of the protective surface layer due to UV exposure), can lead to more severe issues like “alligator cracking”—a pattern of interconnected cracks resembling alligator skin—which signals widespread sub-base failure and often necessitates more extensive repairs.
Poor drainage is another major contributor. If a driveway lacks a proper slope or effective drainage systems, water can pool on the surface, prolonging its contact with the tarmac and increasing the likelihood of infiltration. Similarly, heavy loads from large vehicles can stress the pavement beyond its capacity, especially if the sub-base was poorly prepared during installation. Tree roots, while less common, can also exert pressure from below, causing cracks and upheavals that evolve into potholes. By identifying these underlying causes, we can implement more targeted and long-lasting repair and prevention strategies, safeguarding our driveways for years to come.
Professional Restoration vs. DIY Patching
When faced with a pothole, homeowners often weigh the options between a quick DIY fix and professional intervention. Both approaches have their merits, but the choice largely depends on the severity of the damage, the desired longevity of the repair, and the specific characteristics of the driveway.

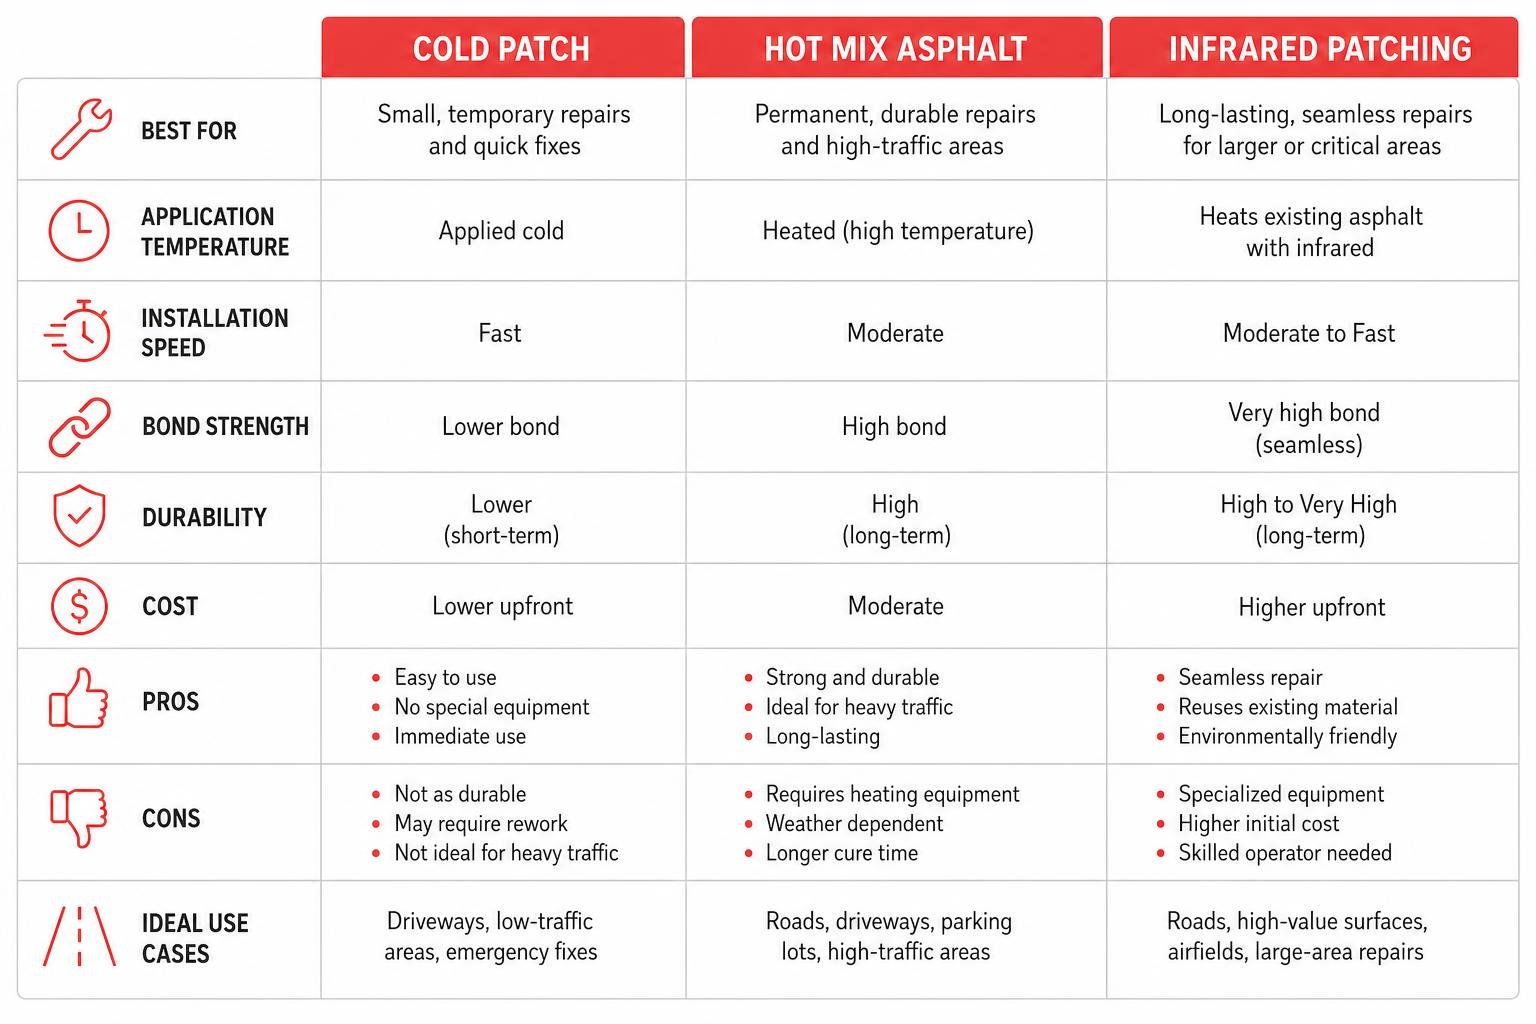
DIY patching typically involves using cold patch asphalt, a ready-to-use material available in bags. This method is straightforward: clean the pothole, pour in the cold patch, and compact it. For minor, shallow depressions, a cold patch can offer a temporary solution, especially when immediate action is needed to prevent further damage or address a safety hazard. However, cold patch repairs are often less durable and aesthetically pleasing than professional alternatives. Failures frequently stem from improper compaction or insufficient preparation of the pothole’s edges, leading to the patch dislodging or crumbling prematurely. While it’s possible to achieve a decent cold patch repair by chiseling the hole to create square edges, thoroughly cleaning the surface, and packing the material firmly, it generally won’t match the lifespan or seamless finish of a professional job. For those looking to undertake more complex Custom hardscaping repair projects themselves, understanding the limitations of cold patch is crucial.
Professional restoration, on the other hand, offers a range of advanced techniques designed for superior durability and a more integrated finish.
One such method is hot mix asphalt repair, where heated asphalt is applied and compacted. This creates a much stronger bond with the existing pavement and cures to a denser, more robust surface than cold patch. Hot patching is generally considered a more permanent solution for significant potholes.
Another highly effective professional method is infrared patching. This innovative technique involves heating the damaged asphalt area to over 300 degrees Fahrenheit, effectively softening and rejuvenating the existing material. The heated asphalt is then raked, a rejuvenator is applied, and new hot mix asphalt is blended in, followed by thorough compaction. This process creates a seamless, waterproof repair that integrates the old and new asphalt, often recycling a significant portion of the original material. Infrared repairs are particularly advantageous because they can be performed year-round, even in colder temperatures, and allow for traffic almost immediately.
The key differences between DIY and professional methods lie in edge preparation, compaction density, and structural bonding. Professionals often use specialized tools like circular saws to cut neat, vertical edges around the pothole, creating a “picture frame” that allows for better adhesion. They also apply tack coats or cold pour emulsion to the vertical edges, enhancing the bond between the old and new material. Mechanical compaction, using rollers or vibrating plates, achieves a much higher density than manual tamping, preventing voids and ensuring a more durable repair. While DIY can be cost-effective for very small, non-critical repairs, larger or more persistent potholes typically benefit from the expertise, equipment, and advanced materials that professionals bring to ensure a long-lasting and structurally sound solution.
The Step-by-Step Process of Professional Tarmac Repair
Achieving a durable and aesthetically pleasing tarmac repair, especially for potholes, requires a meticulous, step-by-step approach. While the exact methodology may vary slightly depending on the chosen repair technique (cold patch, hot mix, or infrared), the core principles of preparation, application, and compaction remain critical. Here, we outline the general process for a robust repair.
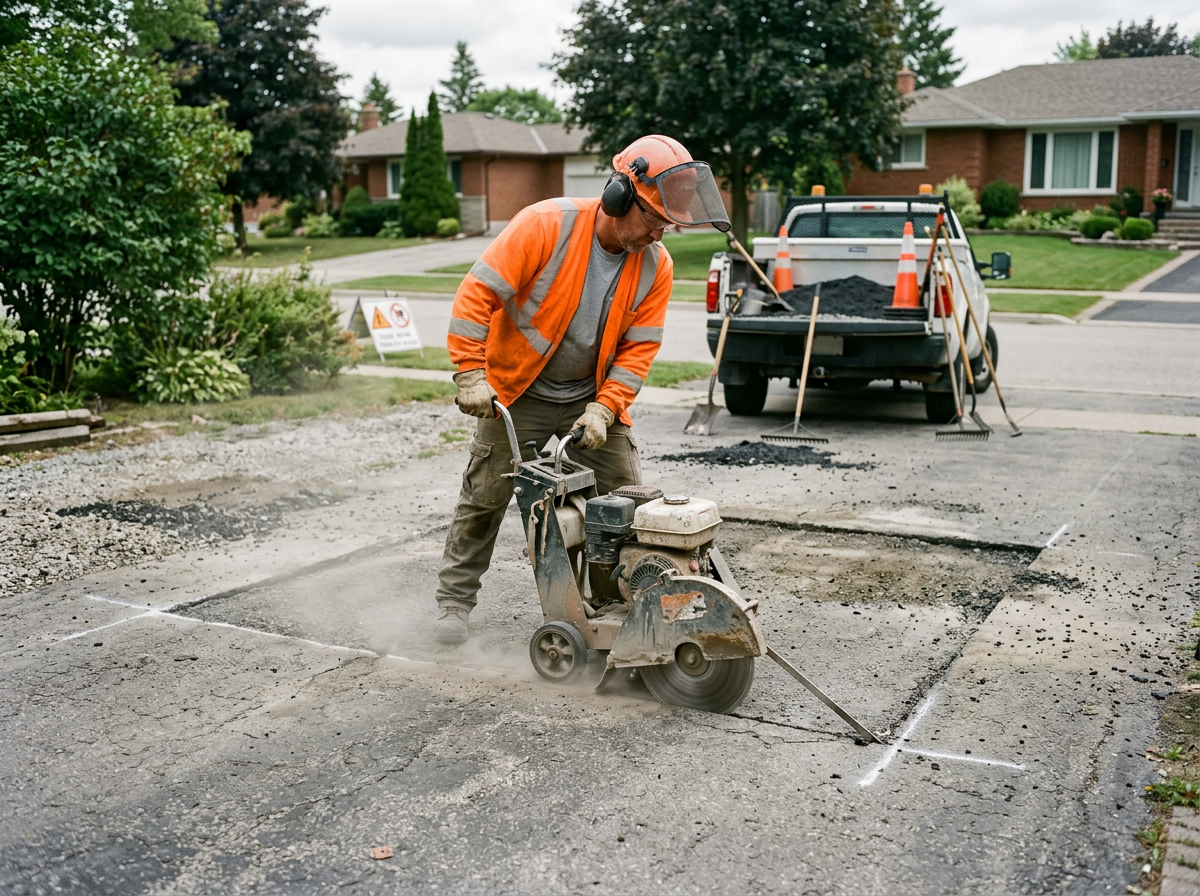
1. Assessment and Preparation: The first step involves a thorough assessment of the pothole. We identify its depth, diameter, and any surrounding areas of weakness or cracking. Next, the area is meticulously cleaned. This involves removing all loose aggregate, dirt, debris, and vegetation using a stiff brush, wire street broom, or even a pressure washer. It’s crucial that the pothole is dry and free of standing water for optimal adhesion. For cold lay tarmac, warming the material slightly indoors or by placing the bag in the sun can make it more pliable and easier to work with, especially in cooler weather.
2. Square Cutting and Edge Preparation: To create a strong, lasting repair, we avoid “feathered” edges, which are prone to crumbling. Instead, we use an angle grinder, floor saw, or circular saw with a diamond blade to cut a neat, rectangular or square shape around the pothole. This “picture frame” approach ensures straight, vertical edges that provide a solid boundary for the new material. We typically cut back at least 100mm (approximately 4 inches) from the visibly damaged area to reach sound pavement. The damaged material within this cut-out section is then removed to a depth of 50-70mm (2-3 inches) to create a clean, stable base for the new patch.
3. Tack Coat Application: Once the pothole is clean and its edges are squared, a tack coat is applied. This is a crucial step often overlooked in DIY repairs. A bitumen tack coat or cold pour emulsion is brushed or sprayed onto the vertical edges and the base of the cleaned-out pothole. This bonding agent acts as an adhesive, creating a strong bond between the existing tarmac and the new repair material, which is vital for preventing the edges of the patch from lifting or separating over time.
4. Layering and Filling: For cold lay tarmac or hot mix asphalt, the material is added in layers rather than all at once. Typically, we fill the pothole to about three-quarters of its depth with the first layer. For cold lay, this might be a 45mm (1.75 inch) layer. If using a water-activated cold patch, a small amount of water might be added as per product instructions. The material is then spread evenly with a rake or lute.
5. Compaction: Compaction is arguably the most critical step for durability. After each layer of material is added, it must be thoroughly compacted. For smaller repairs, a hand tamper, sledgehammer with a wood block, or even the weight of a car can be used. For larger areas, a vibrating plate compactor or roller is employed to achieve maximum density. The goal is to compact each 45mm layer down to about 30mm (1.2 inches), removing any air voids that could lead to future water infiltration and weakening. We continue adding layers and compacting until the repair is slightly mounded above the surrounding surface. This slight overfill accounts for future settlement under traffic, ensuring the patch finishes flush with the existing driveway.
6. Finishing and Edge Sealing: Once the final layer is compacted flush, the repair is often sealed. For cold lay tarmac, applying kiln-dried sand over tacky repairs in warm temperatures can prevent sticking. For a truly professional finish and added protection, over-banding tape can be applied around the edges of the repair. This tape melts and adheres to both the new patch and the old tarmac, creating a waterproof seal that prevents water from re-entering the repair seam. This final step enhances the longevity and durability of the repair, ensuring it stands up to the elements and traffic for many years.
Long-Term Prevention and Maintenance Strategies
While effective pothole repair is essential, a proactive approach to prevention and ongoing maintenance is paramount for preserving the integrity and appearance of your tarmac driveway. By understanding and implementing key strategies, we can significantly extend the lifespan of our hardscaping and minimize the need for costly repairs.
One of the most critical preventative measures is regular sealcoating. Applying a high-quality tarmac sealant every two to three years acts as a protective barrier against the elements. It shields the surface from damaging UV rays, which can cause fading and brittleness, and prevents water, oil, and chemicals from penetrating the asphalt binder. This not only enhances the driveway’s aesthetic appeal but also maintains its flexibility and structural integrity, making it less susceptible to cracking and subsequent pothole formation.
Proper drainage grading is another non-negotiable aspect of long-term prevention. Driveways should be designed with a gentle slope that directs water away from the surface and the property’s foundation. If water pools on the driveway after rain, it indicates a drainage issue that needs immediate attention. Installing channel drains, French drains, or ensuring existing gutters and downspouts are clear and functioning correctly can significantly reduce water exposure, mitigating the risk of freeze-thaw damage and sub-base erosion.
Load management also plays a vital role. Tarmac driveways are designed to withstand certain weight limits. Regularly parking heavy vehicles, such as RVs or commercial trucks, in the same spot can overstress the pavement, leading to depressions and cracks. If heavy loads are unavoidable, consider reinforcing specific areas or distributing the weight more evenly.
Annual inspections are simple yet highly effective. By routinely walking your driveway, ideally once a year, you can spot minor issues like hairline cracks, oil stains, or early signs of vegetation growth before they escalate. Addressing these small problems immediately with crack fillers or appropriate cleaning agents is far more cost-effective and less disruptive than waiting for them to develop into major potholes.
Finally, weed prevention contributes to driveway longevity. Weeds and moss growing in cracks not only look unsightly but also retain moisture, exacerbating the freeze-thaw cycle and further widening the cracks. Regular cleaning with a stiff brush or pressure washer, combined with the application of weed killer, can keep these invasive plants at bay.
To help visualize the differences between common repair methods, here is a comparison:
By integrating these preventative maintenance strategies into our routine, we ensure our tarmac driveways remain smooth, safe, and attractive for many years to come, preserving the value and curb appeal of our entire outdoor space.
Elevating Your Property with Custom Hardscaping
While repairing potholes in your tarmac driveway is a crucial step towards maintaining its functionality and appearance, it also presents an opportunity to consider the broader picture of your property’s outdoor aesthetics. A well-executed tarmac repair seamlessly integrates into the existing surface, but imagine complementing that with custom hardscaping elements that truly elevate your home’s curb appeal and functionality.
Integrating premium materials like brick pavers or natural stone can transform a purely functional tarmac driveway into a stunning design feature. For example, a meticulously repaired tarmac surface could lead into a beautiful brick paver apron, creating a striking visual transition and adding a touch of classic elegance. Beyond driveways, custom hardscaping encompasses a wide array of possibilities, from intricate walkways and patios to robust retaining walls and inviting outdoor living spaces. Utilizing high-quality materials, such as those from Unilock, ensures not only aesthetic appeal but also exceptional structural durability, capable of withstanding the rigors of weather and heavy use.
The design process for such enhancements often involves 3D paving design, allowing us to visualize the transformation before any work begins. This ensures that every element, from the texture of the pavers to the flow of the walkways, complements your home’s architecture and your personal style. For instance, a premium brick paver driveway integrated with natural stone retaining walls can redefine the entrance to your property, creating a grand and welcoming statement. This level of detail and quality in hardscaping goes beyond simple repairs; it’s about crafting an outdoor environment that reflects sophistication and provides lasting enjoyment.
Investing in custom hardscaping extends the benefits of a well-maintained driveway to your entire outdoor space. It’s a strategic move to enhance property value, improve safety, and create an inviting atmosphere for residents and guests alike. Whether you’re in the bustling Chicago suburbs, or the serene landscapes of Cook County or DuPage County, the right hardscaping design can provide an aesthetic transformation that makes your property truly stand out.
Frequently Asked Questions about Driveway Repair
Addressing common questions about tarmac driveway repair can help demystify the process and empower homeowners to make informed decisions.
1. How long should you wait before driving on a newly repaired tarmac pothole?
The waiting period before driving on a newly repaired tarmac pothole largely depends on the type of material used and prevailing weather conditions. For cold patch asphalt, which is a popular DIY choice, it’s generally recommended to wait approximately 24 to 48 hours before subjecting the area to vehicular traffic. This allows the material to settle and begin its curing process. However, some advanced cold-lay tarmac products are designed to cure almost immediately, allowing pedestrian traffic right away and light vehicular traffic soon after. Hot mix asphalt repairs, typically performed by professionals, cure much faster due to their high application temperature, often allowing traffic within hours. Infrared repairs, which blend existing and new asphalt, can also typically be driven on almost immediately. Always consult the specific product instructions or your contractor for the most accurate curing times, as temperature variables (e.g., very hot or very cold weather) can affect how quickly the material sets and hardens.
2. What are the main differences between cold patch and hot mix asphalt?
The primary differences between cold patch and hot mix asphalt lie in their application temperature, composition, and resulting durability.
Cold Patch Asphalt:
- Application Temperature: Applied at ambient temperatures, no heating required.
- Composition: Typically a blend of aggregate and a bitumen emulsion that cures as solvents evaporate or water dissipates.
- Durability: Generally considered a temporary or semi-permanent repair. It’s DIY-friendly and good for quick fixes, but often less durable, more prone to displacement, and can be less aesthetically pleasing than hot mix. Failures are often linked to improper compaction.
- Structural Lifespan: Shorter lifespan, often requiring re-patching within a few years, especially under heavy traffic or harsh weather.
Hot Mix Asphalt:
- Application Temperature: Applied at high temperatures (typically 250-350°F or 120-175°C).
- Composition: A blend of aggregate and pure asphalt cement, heated to a molten state.
- Durability: Provides a much stronger, more permanent, and seamless repair. The heat allows for better bonding with the existing pavement and achieves higher compaction density.
- Structural Lifespan: Significantly longer lifespan, often lasting many years when properly installed, making it the preferred choice for professional, long-term repairs.
3. When should you choose full resurfacing over localized pothole repairs?
Choosing between localized pothole repairs and full driveway resurfacing depends on the extent and nature of the damage. Localized repairs, whether DIY cold patch or professional hot mix/infrared, are suitable when:
- Potholes are isolated and relatively few.
- The surrounding pavement is in good condition with no widespread cracking.
- The sub-base beneath the pothole is still sound.
However, full resurfacing becomes the more sensible and cost-effective option when:
- Widespread Cracking: The driveway exhibits extensive “alligator cracking,” numerous interconnected cracks, or a network of deep fissures across a large area. This indicates a systemic issue with the surface layer.
- Base Failure: There are signs of underlying sub-base failure, such as significant depressions, heaving, or widespread instability. Localized patches won’t address the foundational problem.
- Multiple Potholes: The driveway is riddled with numerous potholes of varying sizes, making individual patching economically inefficient and resulting in a patchwork appearance.
- Significant Deterioration: The entire surface has faded, become brittle, or shows signs of widespread aggregate loss, indicating that the protective binder has degraded.
- Cost-Effectiveness Analysis: If the cost of patching numerous individual areas approaches or exceeds the cost of a new surface layer, resurfacing provides a uniform, durable, and aesthetically superior solution. Resurfacing involves cleaning and preparing the existing surface, and then applying a new layer of hot mix asphalt over it, offering a fresh start without the expense of full removal and replacement.
Ignoring small damages can lead to costly underlying foundation issues, making early intervention or a timely decision for resurfacing critical for long-term savings and structural integrity.
Conclusion
Maintaining a tarmac driveway is an ongoing commitment, but one that significantly enhances the safety, functionality, and aesthetic appeal of your property. From understanding the insidious effects of water and chemicals to choosing the right repair method, each step contributes to the longevity of your hardscaping.
Whether we opt for a careful DIY cold patch for minor issues or enlist professional expertise for hot mix or infrared repairs, timely action is key. Preventative maintenance, including regular sealcoating, ensuring proper drainage, and conducting annual inspections, forms the bedrock of a durable driveway. By diligently addressing small cracks and assessing the need for more extensive solutions like resurfacing, we can avoid costly future repairs and maintain a smooth, inviting surface for years to come.
A well-maintained tarmac driveway is more than just a path; it’s an integral part of your outdoor space and a reflection of your property’s overall care. By applying these insights and embracing a proactive approach, we can ensure our driveways remain a source of pride and a valuable long-term investment in our homes.









 Business Programs

Leave a Reply
Want to join the discussion?Feel free to contribute!